Syncing your mobile or desktop device with Zimbra
We offer UK-based managed hosting
We offer managed WordPress hosting and Zimbra email. We can deliver this direct to the consumer, or through a third-party as a white label service. Further details of our Zimbra services can be found here. Please get in touch with support@opensure.net, or if you prefer use the contact form.
Need help syncing?
We offer detailed syncing advice free of charge to our clients. Please get in touch and we’ll be very happy to help.
Guide to the guides
We’ve built up our guides based on experience and what our clients ask for.
People build up individual combinations of devices and programs, so rather than providing a list as long as your arm, or possibly longer, we’re including here the ones we know people want to see.
List of syncing & configuring guides
Please look through the following syncing guides:
Android: How to Sync with Zimbra Contacts and Calendar
You can use the open standards CardDAV and CalDAV to easily synchronise your Zimbra Contacts and Calendars to your Android smartphone.
Android has no native CardDAV client but some are available from the Google PlayStore and F-Droid.org. We now recommend the free DavX which works really well. We talk you through configuring that client but essentially any others that are available will be similar.
Once you install DavX it will appear in the Android Account Sync area, but simply starting DavX will give you the option to Go to accounts & Sync.
Select Add Account, and choose Login with URL and username as the account type.
The server name is eg https://mail.opensure.net.
Enter your email address and password.
The app will then check the connection and ask for an account name for you to identify the configuration by, eg the email address. Change this as or if desired. Leave the groups as separate VCards.
Your contacts and calendar (and Tasks) are now able to sync.
To change which calendars and address books will sync, open the Accounts area under Android Settings and click on the DavX section listing the DavX accounts. Select Manage Accounts and Click on the account shown that you want to configure. Select the Calendars and Contacts from the list that you want to sync to/from your phone.
The Settings Cog under each accounts area will allow you to more finely configure things like intervals, connections etc.
iPhone: How to Sync with Zimbra Email
You can use the open standards called IMAP and SMTP to synchronise your Zimbra email to your iPhone or iPad.
You are connecting to your Zimbra account via IMAP and SMTP over which Zimbra allows connection to your calendar
To configure this on your iPhone or iPad open iPhone Settings application and choose Mail, Contacts, Calendar:
Then select Add Account…:
press Other:
Choose Add Mail Account:
Enter your name, email address and password, then press Next:
Select IMAP account type:
In Incoming Mail Server section, enter mail.opensure.net server
In Outgoing Mail Server section, enter eg mail.opensure.net server then press Next:
Wait until your iPhone has finished verifying all possible port/protocol combination:
It will probably fail to get the service auto-configured so you will likely get the Cannot Connect Using SSL message, or similar, just select Yes, you will just need to adjust account settings later.
Save the account:
Confirm.
Back to account settings page, still need to fix SMTP port as mail.opensure.net prefers to listen on the correct port not (the wrong) default port 25, open account settings:
Open Account Info:
Open SMTP page:
Choose Primary Server: mail.opensure.net
Adjust SMTP port: 587
Back to Account Info, open Advanced settings:
Enable SSL on IMAP port:
iPhone: How to Sync with Zimbra Contacts
You can use the open standard called CardDav to synchronise your Zimbra contacts to your iPhone or iPad.
You are connecting to your Zimbra account via a special URL over which Zimbra allows connection to your contacts.
To configure this on your iPhone or iPad open iPhone Settings application and choose Mail, Contacts, Calendar:
Open iPhone Settings application and choose Mail, Contacts, Calendar:
Then select Add Account…:
press Other:
Choose Add CardDAV Account:
Enter your Zimbra server hostname in the Server field,
eg mail.opensure.net
provide your username and password then press Next:
username=your@email.address
password=yourpassword
On the account page, open Advanced Settings:
Enable SSL
Done!
iPhone: How to Sync with Zimbra Calendar
You can use the open standard called CalDav to synchronise your Zimbra calendar to your iPhone or iPad.
You are connecting to your Zimbra account via a special URL over which Zimbra allows connection to your calendar
To configure this on your iPhone or iPad open iPhone Settings application and choose Mail, Contacts, Calendar:
Then select Add Account…:
press Other:
Choose Add CalDAV Account:
Enter your Zimbra server hostname in the Server field,
mail.opensure.net
provide your username and password then press Next:
Username = your@email.address
password = password
On the account page, open Advanced Settings:
Enable SSL and check port, make sure Account URL resembles:
https://mail.opensure.net/dav/your@email.address/Calendar
or
https://mail.opensure.net/principals/users/your@email.address
AppleMail: How to Sync with Zimbra
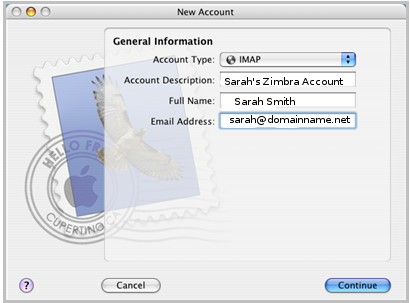
The first step to creating your new Zimbra account in AppleMail is to select the IMAP setting. Give the Account Description field a title useful to you (no-one else will see that field). In Full Name enter your name as you'd like it to appear in recipients' inbox, and in email address enter the email address we're providing for you. Click on Continue.
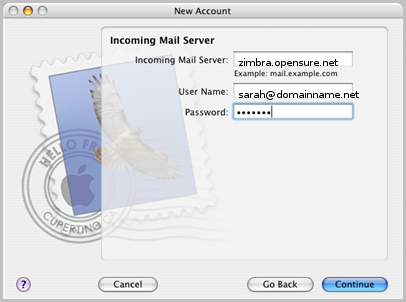 The address for the Incoming Mail Server is zimbra.opensure.net. Your User Name is your email address. Enter your password then click on Continue.
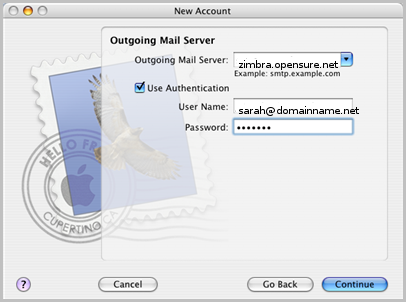 The Outgoing Mail Server is also zimbra.opensure.net. Tick Use Authentication, then once again enter your email address in the User Name field, and fill in the Password field. Click on Continue.
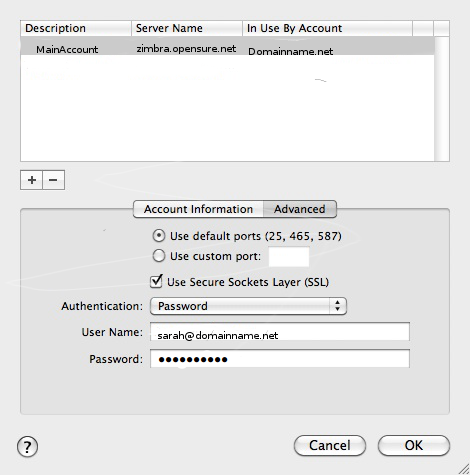
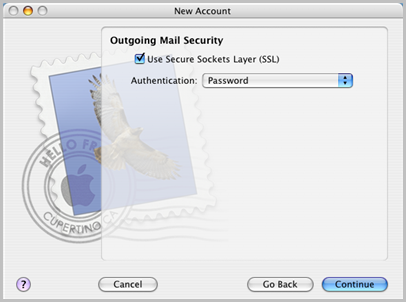 Make sure the Use Secure Sockets Layer (SSL) field is ticked, and set Authentication to Password. Click on Continue.
This is the main part complete. However, we may ask you to check server information. To do this, click on the selection arrow by the Outgoing Mail Server field, and choose Edit SMTP Server List. Highlight the domain that we look after for you (whether or not you have a list of servers to choose from will depend on whether you have other accounts running through AppleMail), and make sure the information is as follows, with your own user name and password entered in the relevant fields:
Thunderbird: How to Syncemail client with Zimbra
This is designed to help you setup a new account in Thunderbird for your new mailbox. We recommend Thunderbird (www.mozilla.com the same people who write Firefox web browser – also recommended) as a free and powerful mail client in preference to Outlook as it is a standards compliant approach and works very well with modern mail systems.
To configure Thunderbird to use a Zimbra email account with IMAP:
- Select Tools – Accounts settings then select Add Account, Email Account type and click Next.
- Enter your name as you wish people to see it, and then your email account, eg my.name@domain.here
- Select IMAP as the type of server and enter zimbra.opensure.net as the name, it is personal choice whether to select global folders or not, most tend to. Click Next.
- Now enter incoming username, which is the same as your email address click Next.
- Enter the name you would like to use to refer to this account and click Next, confirm all is correct and press Finish.
- In the left hand panel, highlight and expand the new account named above and click Server Settings.
- In this Click Incoming server uses SSL and check that the port has changed to 993.
- Now click down to Copies and Folders for this account and check that the Sent, Draft and Template folders are showing as send a copy to whatever the name of this new account is.
- Composition and Addressing, set as per your preferences.
- Clicking now into Off-line and Disk space, please set as per your preferences normally tick both top boxes and select all folders available off-line. Leave the lower section to retain all email.
- At the bottom of the left hand panel is the list of Outgoing servers, here click add and add the name of Zimbra, server as zimbra.opensure.net, change the port to 587, tick TLS, tick username and password and fill is with your username (same as email address). Click OK.
- Now click Get Mail and enter your password as required, saving it permanently if desired.
Thunderbird: How to Sync Contacts and Calendars with Zimbra
Configuring Thunderbird and TB-Sync to synchronise your Contacts and Calendars on our Zimbra service.
Again we recommend using Zimbra Desktop to do this but if Thunderbird is your thing then here is how you can do a neat synchronizing trick with the smart set of add-ons: TB-Sync and Provider for CalDAV & CardDAV.
Setup Add-ons in Thunderbird to sync Zimbra Contacts (and Calendars)
First we assume that Thunderbird is properly installed and configured ready for your OpenSure Zimbra email account.
In Thunderbird Menu select Add-ons.
Search and install the add-ons ‘tb-sync’ and ‘provider for caldav and carddav’
When installed, manage the Tb-Sync add-on and add a new CalDAV/CardDAV account with Automatic Configuration.
Give your account a new name to refer to it, then your username is your Zimbra email address and then enter your Zimbra password too.
All your account’s calendars and contacts lists are shown in the listing from which you can select as many as you need or want.
Then you can use and sync all the Contacts and Calendars from Zimbra within Thunderbird.
Outlook: How to Sync with the Zimbra email service
This is designed to help you setup a new account in Outlook for your new mailbox. We recommend Thunderbird (www.mozilla.com the same people who write Firefox web browser – also recommended) as a free and powerful mail client in preference to Outlook as it is a standards compliant approach and works very well with modern mail systems. However, this is about what you want to do so here you go!
To configure Outlook to use a Zimbra email account:
- In Outlook, click Accounts on the Tools menu.
- In the Internet Accounts dialogue box, click Add, and then click Mail
- In the Display name box, type the name that you want other users to see when you send a message, and then click Next.
- In the E-mail address box, type the e-mail address for the account that you are using (for example, type my.name@domain.here), and then click Next.
- In the E-mail Server Names box, click IMAP for the incoming mail server type (POP3) is the default type)
- Type mail.opensure.net as the incoming (IMAP) and outgoing (SMTP) servers and Click Next.
- Type your IMAP account name and password in the Account name and Password boxes then click Next.
- In the Internet Mail Account Name box, type a name to identify the mail account, and then click Next and Click Finish.
- You should now be able to highlight this new account in the Internet Accounts window and then select ‘Properties’ When in this window click Advanced.
- In the Advanced window tick Incoming Mail – This server requires a secure connection SSL – the Port will automatically change to 993.
- Above this is the Outgoing Server equivalent tick box. You should set the SMTP service to StartTLS on port 587.
- At same Properties window as when finding the Advanced tab, you will see a ‘Servers’ tab. Move to this and click the Outgoing Mail Server – My server requires authentication. Leave as using the same settings as incoming mail server.
- Click OK then Close to close the Internet Accounts dialogue box.
- When you are prompted to Refresh or download folders from the mail server, click Yes and enter password assigned as required.
My device or program isn’t here
No problem. If you’re a client please don’t hesitate to ask for a walk-through that isn’t here. If it’s within our remit to provide one, then we will.
Using the contact form please give us details of what you’re trying to do.